Sunday 26 August 2012

Homemade Peanut Butter

I was very excited to discover you can make peanut butter with just peanuts. It makes sense really, I had just never thought of it.


So I went out and bought some peanuts. They were the salted kind, because I couldn't find unsalted, but I read a few other blogs, and they insisted this was okay. It's more natural with just peanuts, but it will still be peanut butter.

Basically, you just blend or process your peanuts until they turn into peanut butter. I started with two cups of peanuts, and then after a little while decided that there wasn't enough in my food processor for it to process, so I added another two cups. And then you just keep blending. I needed to stop and let my food processor cool down a lot, because it became pretty thick and hard to handle, and I don't have a real quality food processor.


The first two cups of peanuts at the beginning.
They quickly turn into crushed peanuts.
It then releases some oil, which made it too thick for it to work right.
Added more peanuts, another two cups.


The crushed peanuts with the dough-like stuff
It then becomes the consistency of cookie dough
You'll see the oils are starting to release, but it's still very crumbly

It will become smooth, but thick and chunky. At this point, it's preference. If you stop it and like the texture, then it's done. It will start chunky, and become smoother.
I was very excited to discover I already had an empty peanut butter jar!
The finished product
Once you've got it the texture you like, remember that it will thicken in the fridge. It's probably a little warm from your food processor, but if you pour it into a jar and put it in the fridge, it will thicken up to the consistency of normal peanut butter. Also, you have to keep it in the fridge!

So after all of this, I really liked my final product! Mine isn't perfectly smooth, but maybe it might be with a better food processor. I had some on a sandwich, and you really can't tell though. So all in all, it's good, I figured it is cheaper than buying regular peanut butter (but not by much), however it is much cheaper than buying natural peanut butter. It's good, I like it, and it's not hard to make. I think I'll keep making it. The only downside - you have to keep it in the fridge. Which is just like any natural peanut butter, really.

Monday 20 August 2012

T-Shirt Recreation - Ode to Pippi Longstockings

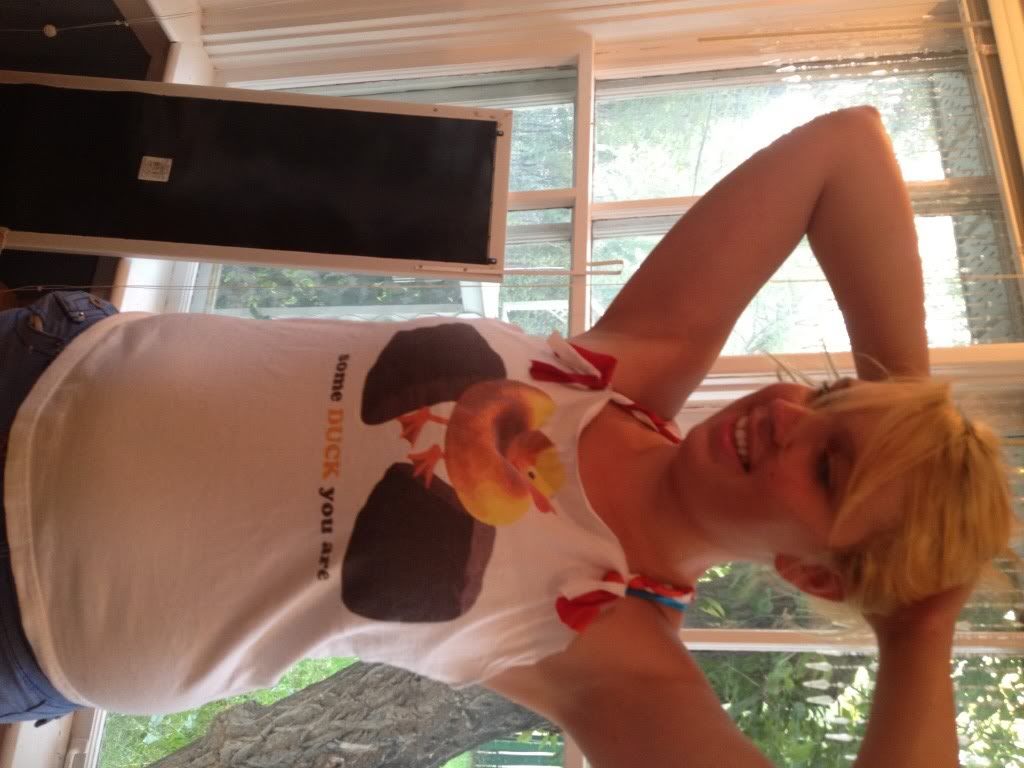
I have this fantastic book on t-shirt revamping. I pick it up every couple months, and slash another t-shirt or two. So over the last few years, I've made quite a few of the designs. I decided to make another one today, that describes itself like Pippi Longstockings. Braids, mismatched colours, fun adventure... Yep, this shirt has it all.


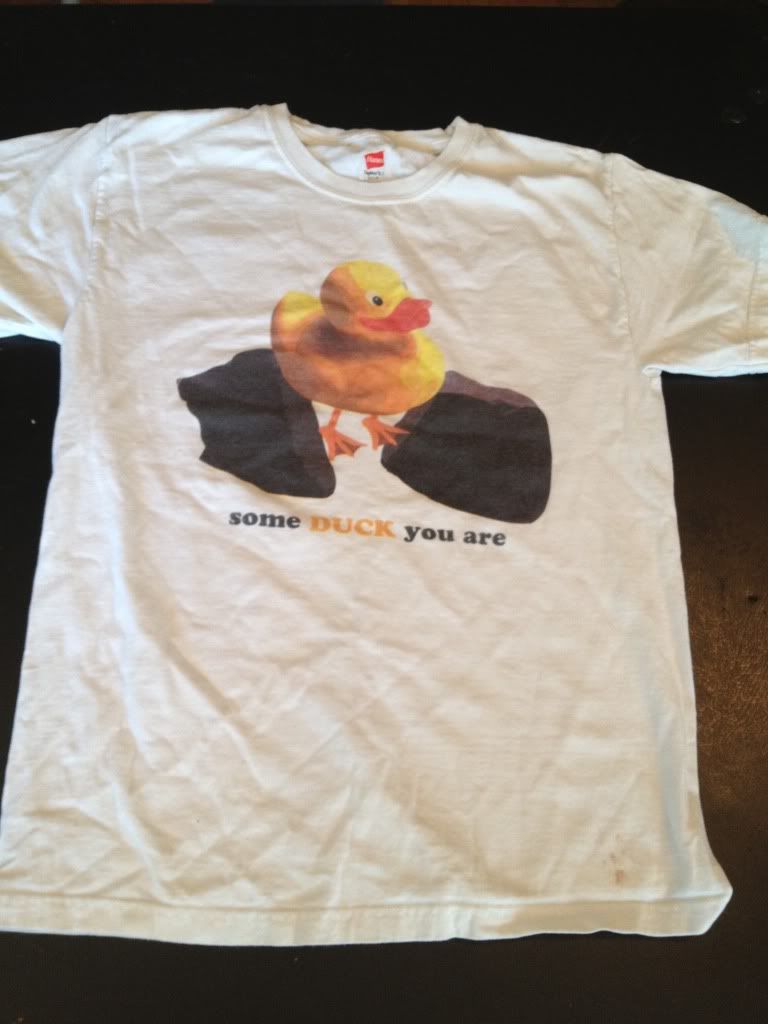
I started with a band t-shirt I picked up awhile back. I loved the designs, but like all band t-shirts, I never wear it, because I hate the way they wear. You know what I mean; the high collar, the longer sleeves... They just aren't feminine enough for me, I guess.

So I've taken to cutting them up. But when they have a cute design, it takes some thinking to come up with the right design to work around it. Well, I finally found one that would work with this cute ducky shirt!

The first thing I did is cut the sleeves off, just inside of the seam. I was tempted to wear it like this for a day, just to see what my husband would say.


Flip it over next, and cut straight across from the bottom of one armhole to the other, but only through the back layer. Don't cut the front half yet!


Okay, once you've got that, you can flip it back over and cut the front half. I flipped the back part up, so that I wouldn't accidentally cut it. Not that I have plans for that scrap, but never damage a scrap you might be able to use later. Anyways, you've got your shirt front-up, now? Cut a straight line from one mid-armhole to the other. I cut it a little high, because I'm a little bustier than the woman who wrote the book, and I'm usually accommodating for that. I figured I could always trim it down later anyways. I did end up trimming an inch off, but I wish I'd trimmed another inch or two. Right to the duck's head? Anyways, cut it where you want, but remember, you can always cut more; you can never uncut.


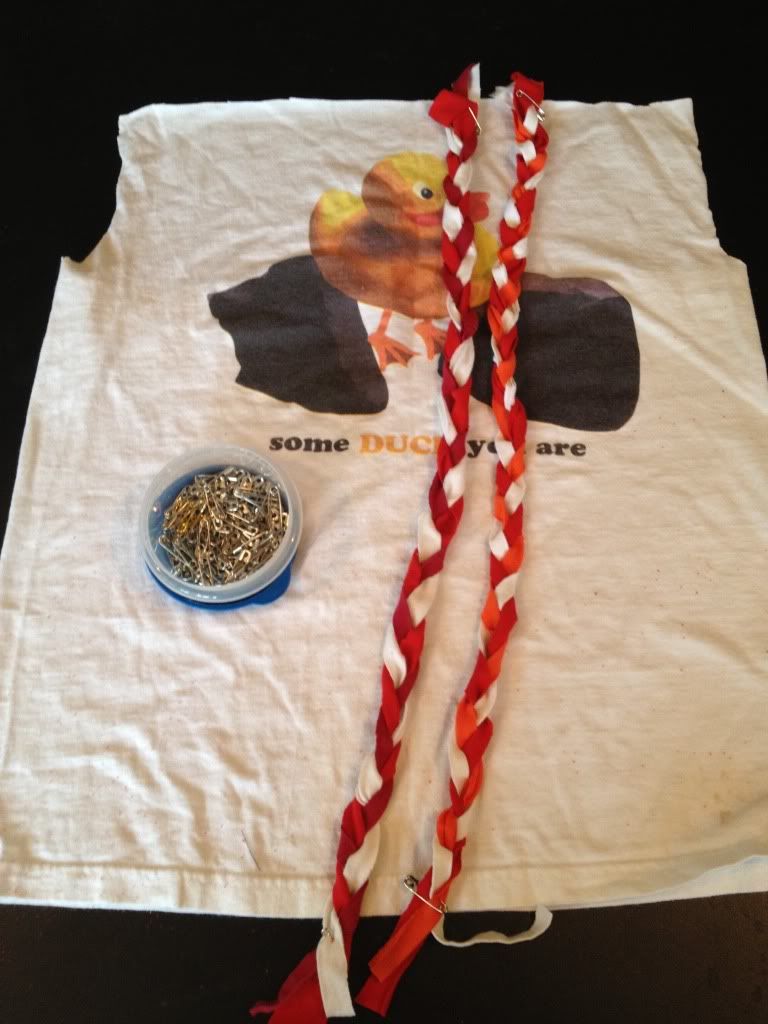
The next part was probably the most intensive. You need six 1" wide 30" long strips of fabric. They suggest you cut three of them from the bottom of the shirt, but I thought the shirt would be too short, so I cut them from the bottoms of all my other scrap shirts. It took awhile to find long enough pieces in coordinating fabrics, and then to cut them, but if you're prepared, this could be a lot easier.


I picked two whites, and then two matching reds, one orange and one darker red. The strips could all clash if you wanted, but I was trying to work with the yellow/orange of the duck. So you divy up the strips into two groups, and pin them and braid them.


Just braid as much as you can. Some of it will unbraid later, so don't worry if the strips end up uneven, or anything like that. Just braid. I found it easiest to hold the safety pin end in my mouth, because I didn't have a helper, but I would suggest getting someone to hold one end you can make sure it all turns out right.


So flip the shirt over again, and mark two holes centered on the back, 9" from each other, and about 1" from the top. Thread one end of each braid through each hole. Don't knot it or anything just yet, just flip it back over again.


Now you need two holes where you want the straps in the front. I tried on the shirt, and shoved a safety pin where I wanted the straps. They say to put them in those corners, so after I had the straps through, I made those spots the corners and trimmed some more fabric off. Whatever works for your shirt and your body.

So cut those holes, and thread the other ends of the braids through so that the straps make an X in the back.


Put it on again, and you might need a helper for this bit, pull and adjust all four strap ends until it's tight enough, not too tight, and the ends are the right lengths. Then tie a knot in each end. I started with the front two, just tying them so the dangling ends were a good length, and then get someone to pull and tie the back two ends so that the shirt sits right on you. Trust me, this is a lot easier with four arms. Take it off and trim down the ends to whatever you want. I trimmed that longer side to match the left.


I apologize, but I tend to wear a sports bra when I'm making myself a new shirt, so I can pull it on and off without bulk, or being naked in my sewing room for all the neighbours to see. When I really wear this shirt, I promise not to wear a bright blue sports bra, so just ignore it for now.


Overall, I really like the shirt. It's really summery, and I wish I'd made it earlier. If I wear a sweater, I'll hide those fun little straps, but I'll freeze as the temperature drops. Ah well, it can always wait until next summer.

Friday 17 August 2012

Story of an Apple

So, for my birthday a few months ago, my husband bought me a dehydrator. I know, it was a very romantic birthday present, especially for the first birthday in our marriage. But he asked what I wanted a few months prior, and I said a dehydrator. I know I'm hard to shop for, and I know I'm especially picky about birthday presents. I knew I wanted one, and I knew it was the kind of thing he wouldn't let me spring for any day of the year. So, come my birthday, I unwrapped a... drum roll please, a dehydrator. Haha. I was ecstatic.

I've made several things in it since, and the first batch of anything never really turns out. It's a trial and error kind of thing. But I've made enough apples to get it down to a system now, so I thought I'd share my process, and pictures.

First of all, I also have a mandoline. We picked it up for really cheap on sale one day, and I didn't use it for awhile. But it makes dehydrating a lot of things a lot easier.


So here's what I started with. This time I'm making them with cinnamon. I don't always; they're fantastic all on their own.

So that's a pretty basic red delicious apple. I tried a few different kinds of apples, and I like red delicious. They don't seem to have as many seeds as some other kinds, and the few they do have pop out nicer. I also like the dark shade the peel turns in the end, as opposed to a yellow or green apple, which ends up looking a little sickly. So I just started with one single apple. I usually dehydrate four or more at a time, as many as my dehydrator will fit. But for the pictures, I'm only using one.


I ran the apple through my mandoline with the thin slicing blade, until I just had enough to hold. I used to slice as much as I possibly could, but I cut myself a few too many times. I find it nice to just much that top inch or so. Also, I use the thin blade, because I don't find much difference between thin and thick, once finished, but I get a lot more slices out of the the thin. So I just feel like I'm making more. Certain fruits, I slice on thick because they hold together better that way.

I pick them up, one slice at a time from the pile the mandoline makes, and check for stem or seed pieces. The mandoline will happily slice the seeds along with the apple, so I usually have several pieces, rather than a few seeds.

I arrange them on a plate, slightly overlapping so that I waste as little cinnamon as possible. If I'm not making cinnamon apples, I don't bother with a plate. I just pick them up one at a time and arrange them into the dehydrator.


I gently sprinkle cinnamon onto them, but only on one side. I don't see the point in sprinkling both sides. One is enough to make them taste great, and I'm kind of afraid the powder will make a mess of my dehydrator if it's facing down. Normally, I would have sliced just more than one apple to fill the plate perfectly, but I wanted to show you how much one apple makes.


Once arranged in my dehydrator, these apples fill one tray quite nicely. Other apples I've used are wider, and I can't fit more than one row of slices, except for the weird pieces in the middle. And a single apple will usually fill a tray and a half or two. But these are smaller, and I think I like that better.

You can see I have another tray underneath, and that one also has a single apple on it. I have five trays, so if I squish, I could make five and a half apples at a time, but I don't see the point. For now, I'm sticking with an even five.

My book says apples take 4-8 hours. When I slice them this thin, four is usually good, but it doesn't seem to hurt them to leave them in longer. So I put them in at lunch, and collect them after work, or whenever I have time that evening. They're good like that.

The finished product